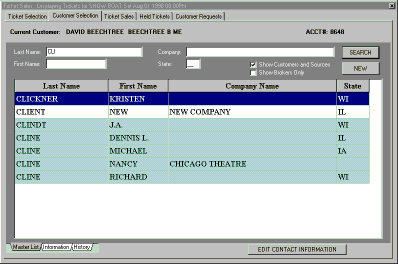
For this demonstration, we will use the client named "NEW CLIENT". We will first search the customer rolodex to find out if this customer is already in our system. To perform this search, we will enter in a partial last name and press the ENTER key on the keyboard. Since we entered CLI into the last name search field, all clients with a last name beginning with CLI are pulled up. Since NEW CLIENT is on the list, we will select him by double clicking the mouse on that entry in the grid.
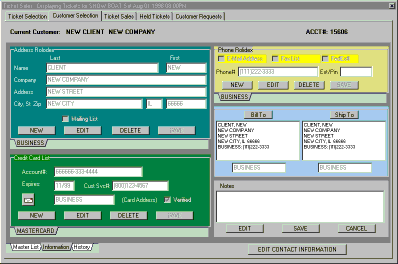
The customer rolodex is now opened for our selected customer. As you can see, each customer has an address rolodex, a phone number rolodex, and a credit card rolodex. Each entry is associated with a rolodex tab. A customer may have as many address, phone, and credit card entries as needed. A set of notepads is also attached to each customer. The 'public' notepad is normally displayed. If the word NOTES is capitalized for a customer, this is an indication that a 'private' notepad also exists. This notepad may be accessed by right clicking the mouse in the notes window and choosing private notes from the menu.
Addresses and phone numbers are also associated with each order via the rolodex. To select an address and phone number for use on this order, simply select the proper tabs from each rolodex. Then, by pressing the Bill To or Ship To buttons, those entries become associated with this order.
Once all the customer information has been selected, we may click on the Ticket Sales tab at the top of our form to complete the order.